
Published in earlier issue of PopUp Times magazine
by Bill Baker
Our Coleman Santa Fe, equipped with fridge, furnace, hot water system, gas and electric cooking, A/C, awning, add-a-room, and porta-potti, serves admirably as our home away from home while on vacation, but lacks one feature our family of four would really appreciate…an inside shower! After searching vainly for an affordable shower system, I designed and built my own that is quick to set up, easy to use, takes very little space to store, and is easily adaptable for use in many types of campers.
 Assuming your camper is equipped with a hot water system, there are five main elements required: a shower rod, two shower curtains, a shower pan, a gray water drain system, and a hand held shower head and hose. Pop up campers lacking a hot water system can be fitted with an electric water heater. Check out www.edferg.com!
The Shower Rod
I used ½” PVC pipe and 90 degree angles since it is inexpensive and easy to cut with a hacksaw. I’d recommend a square about 28”x 28”—large enough to create a comfortable shower space but small enough so the curtains will hang into the shower pan without slipping out. To avoid putting any holes in our ABS ceiling, I hung the shower rod between the door track and the curtain track on our Santa Fe. (I used plastic clothing hooks, which are fastened to the door track with cable ties, and simply hung on the curtain track.) Since the span between the door track and curtain track in our Santa Fe is greater than 28”, the main outline of my curtain rod is actually 32”x 28”, with a second cross member forming the 28” square. Once you are satisfied, use GOOP to hold the joints together.
The Shower Curtains
I used two 72”wide x 70” long, white, heavy-duty (Martha Stewart) vinyl shower curtains, with metal grommets for hook holes. (Metal grommets prevent ripping, heavy vinyl doesn’t suffer static cling like cheap curtains do, and light colors show water and soap buildup the least.) I trimmed the width of each by about 6”, overlapping one with the other by two hook holes (no need to seam them together). After showering, I take the curtains out to the add-a-room to dry, hanging them from a second PVC rod, creating a privacy room for the porta-potti.
The Shower Pan
 After several attempts, I settled on a heavy-duty laundry tub (20”x 20”) for several reasons: it’s inexpensive, has a threaded drain outlet on the bottom, is available with legs, and is made of a material that is easy to cut with a jigsaw. Avoid the cheapest plastic ones; the one I have is made of ¼” thick material. Although probably not necessary, I did add some support to the underside using 1”x 3” stock to make the floor feel a little less “spongy.” After screwing a 90 degree angle drain adapter onto the threaded drain outlet, I cut the four legs so the drain would clear the floor, then secured it with a bit of GOOP. I then cut the four tub sides with a jigsaw so the overall height of the tub was 11”. (It now slides right under our dinette table when traveling, serving as a storage container for the shower curtains and add-a-room panels. While camping, I keep the tub out in the add-a-room, using it for washing dishes, draining directly into a 5 gallon collapsible jug, using the same type of press-fitted drain line as used for the shower.
The Gray Water Drain System
 The gray water outlet on Coleman campers has a 1.75” outside thread, so I designed an adapter which uses ABS and PVC adapters and a 1.25” sump pump hose. It’s inexpensive, yet our galley sink drains really well. For the shower, I simply selected ABS parts that would PRESS FIT onto the shower pan drain outlet, allowing the water to drain out of the pan through the sump pump hose which runs through a hole I cut in the floor under the galley. Once outside, I joined the galley sink drain line and the shower drain line together using a PVC “T.”
The Shower Head and Hose
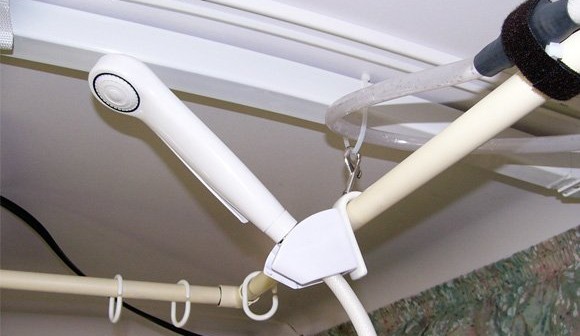
I recommend a hand-held showerhead with a built in water on/off switch. We simply have one person hand the shower wand to the person inside the shower, and adjust the water temperature, as required. The galley faucet on our sink is threaded, so I removed the strainer on the end of the faucet, took it to Home Depot and asked them to put together a couple of threaded adapters that would allow me to connect the shower hose to the galley faucet. By adding a second length of hose, I can now loop the hose over the shower rod, using the nearby end bunk support pole. Coincidentally, one of the ceiling lights in our Santa Fe shines directly into the shower, resulting in a nice bright environment!


No Responses to “Portable Inside Shower System”